Sowing’s so easy – 5 steps to happy young plants
The first thing to decide is where you want to start your seeds – do you want to put them straight outdoors where you want the plants to grow, or indoors where you can have more control over their growing conditions?
We’re focusing on indoor sowing here – read on for our five-step guide to show you how easy this is to do:
Here’s how to prepare everything

1. Pick a location for your plant nursery
You want the brightest possible place for your seed containers – right by a window would be an excellent choice. Many seeds germinate well at temperatures of around 20°C. Some varieties originally from tropical regions need significantly higher temperatures – while others still need colder conditions, too. Check the back of your seed packet for specific instructions.
Refer to the instructions on the back of the seed sachet.
So a cosy spot on a south-facing windowsill right by a radiator may be wonderful for growing tomatoes – but lettuce seeds prefer cooler conditions, and will need a very bright location by an unheated window: in a hallway, perhaps.
2. Get together everything you’ll need for starting your seeds
Seed compost & a little sand
For beginners it’s easiest to buy a small bag of specialist seed-sowing compost. This is compost that is deliberately low in nutrients, loose and free-draining but good at retaining moisture. This creates the ideal conditions for healthy young plants. In their early days seedlings shouldn’t be given high levels of nutrients – this encourages the little plant to form lots of roots in order to seek out the nutrients it needs, which is precisely what we want to happen.
Be sure to buy peat-free compost to protect our peatlands.
You will also need a small bag of light quartz sand. Bird sand from a pet supplies store or the light sand used in children’s play pits have precisely the right composition and can be obtained in small quantities. More about how to use it later …

Containers for the compost
There’s no limit to how creative you can be here. Of course, you can use small plastic or clay flower pots with saucers. The pots must have a hole in the bottom so excess water can drain away. But any kind of container that fulfils these criteria will do just as well. You can recycle old egg cartons or loo roll centres. The important thing is that there shouldn’t be any waterlogging in the container, and that you can also water the seedlings from below.
Spray bottle with lukewarm water
There’s nothing better than a spray bottle for moistening the compost and the seeds. The fine spray spreads the water droplets evenly without dislodging the seeds and washing them away.

Transparent plastic film or bags, or clean jam jars
For their first few days of life the tender seedlings will need relatively high humidity levels – until they are bigger and have formed their first roots. The air humidity in standard heated living spaces is too low for them. So for the first few days the containers will need to be covered to create a more humid atmosphere under the cover. Thin transparent plastic bags or other forms of plastic film will do this very effectively. Or you can upturn an old jam jar over the seed container.
Your seed packets
Don’t forget the most important thing of all
Labels, waterproof marker – and a dibber
Because you’re rarely sowing only one kind of plant at a time and because seedlings and young plants can look very similar to start with, it’s really important to label your seed containers to help you remember what’s growing there two weeks later.
A dibber is a very useful tool for sowing seeds – but there’s no need to buy one specially: a wooden skewer, an old pencil or the handle end of a small spoon will do just as well.
The actual sowing starts now
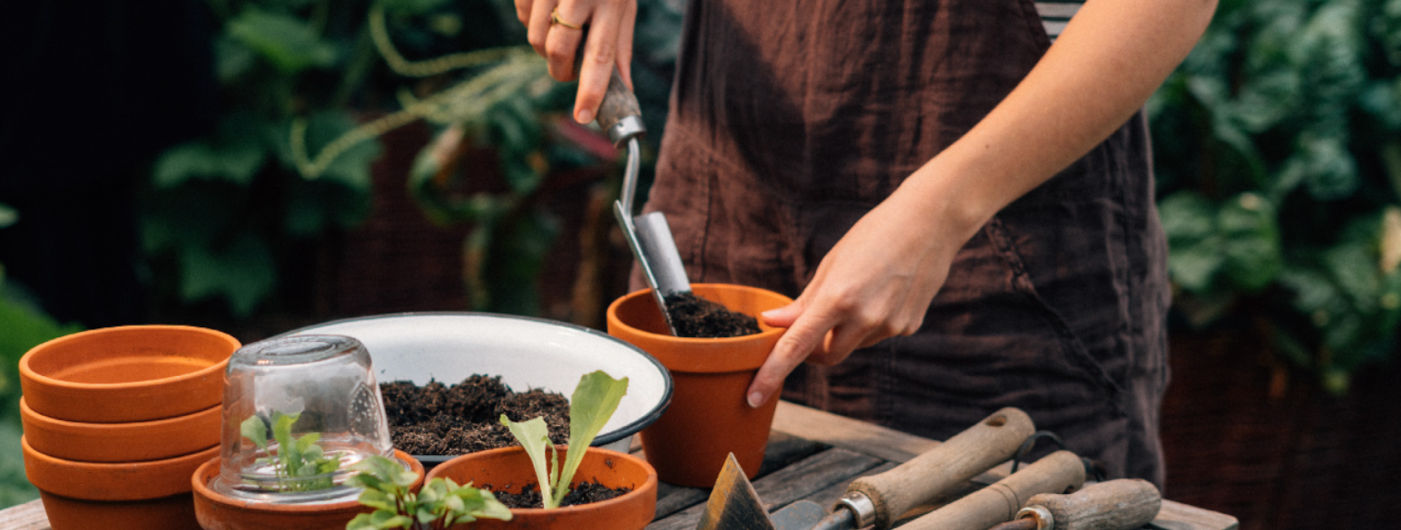
3. Fill the sowing container of your choice with seed compost
Now it’s time to get sowing! Fill the sowing container with seed compost, leaving about a thumb’s width empty below the rim and press down lightly. Spray the surface thoroughly with water so that the compost is well moistened. It shouldn’t be soaking wet, though – if you were to squeeze it in your hands it shouldn’t release drops of water.
4. Sow the seeds, following the instructions on the packet
Now you need to find out how deep your seeds need to be sown – and this information will also be located on the back of each seed packet.
The key difference here is between seeds that need darkness to germinate and those that need light. Seeds that need darkness to germinate must be covered with compost. Seeds that need light to germinate must be left exposed. Scatter the seeds on the compost you have prepared, ideally so that they are spaced out a little from each other. When you’ve done this you can very carefully press them down with your fingertips to ensure good contact with the growing medium.

Now’s the time for that quartz sand: scatter a very thin layer of sand over the seeds. This covering will allow enough light through for the seeds to germinate – while also ensuring that the seeds are protected from drying out and from being washed away.
Seeds that need darkness to germinate are generally sown at a depth ranging between 0.5 cm and 3 cm (see instructions on the back of the seed packet). Using your dibber make a little hole of the right depth in the compost and then drop one or two seeds into it. Fill the hole with compost, press down lightly, and you’re done.

5. Moisten the seeds and protect them against drying out
Moisten the surface of the seed-filled sowing containers carefully again using the spray bottle and then cover them. You can either place the container in a sufficiently large transparent plastic bag, tying it together at the top, or place an upturned jam jar or preserving jar over the pot. After just a few minutes you’ll see that the plastic or glass surface mists over on the inside, becoming covered with a film of moisture. That’s exactly how it should be and shows that you’ve done everything just right.
Don’t forget to label or mark your pots with the names of the plants you’ve sown in them and then place them in that bright spot by a window.
Now it’s a case of waiting patiently. The first green shoots will become visible in the next 5 to 14 days. Until then your only job is to keep checking that the soil is moist – it should never dry out entirely, nor should it be too wet. Every other day take the cover off the pots and air them for a few minutes – this will prevent mould forming on the surface. You can moisten the compost at the same time if needed.
Now that your seeds have started successfully – these are the next steps:
-
Moving young plants to a cooler location
-
Pricking out
-
Adding feed or fertiliser
-
Hardening off
-
Transplanting outdoors